|
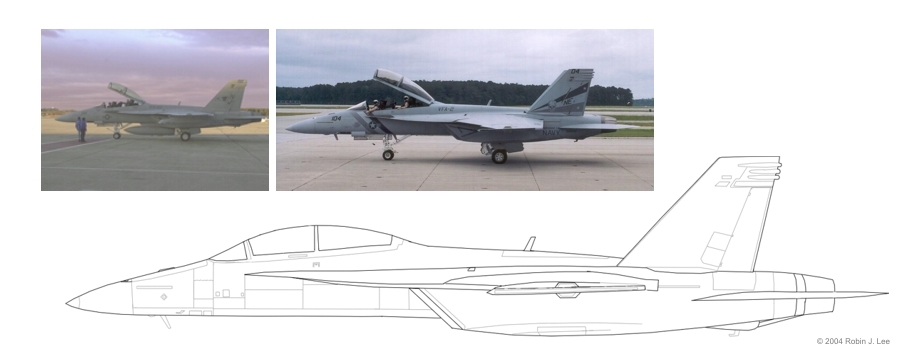
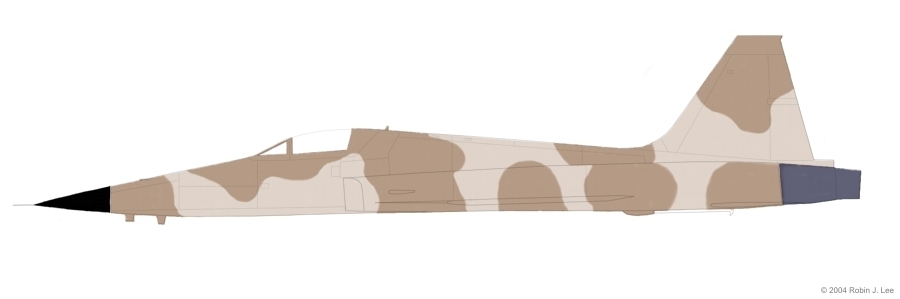
...or, how to hide an appalling lack of artistic talent with the help of image editing software Digital Aviation Profiles in Seven Easy Steps So now you've got your software installed and set up, and are brimming with creative energy. Now what? Step 1. Research your aircraft. This is an area that does not require any artistic talent, but if you don't pay attention to this step the software isn't going to be able to help you. I usually begin by collecting as many photographs as possible from the Internet, starting with the official photo sites of the United States Navy and USAF. Scale model hobbyist sites like this one often have invaluable "aircraft walkaround" features that will give you information about some of the more obscure details of the aircraft. Air show and aviation photography sites like this one are fantastic for documenting markings and serial numbers. In addition, Joe Baugher's lists of USAF and USN/USMC aircraft serial numbers is a great resource. Generally speaking, aviation art is appreciated by the detail-obsessed. Don't worry about seeming eccentric; we all have our own charming little psychological problems. Typically, I decide on the aircraft type first, and in the course of conducting the research phase I'll settle on a particular airframe. My selection is usually driven by the availability of the research materials and the interesting/attractive nature of the color scheme, in that order. The reality is that unless you have a chance to actually photograph the aircraft you want to paint, there are going to be gaps in your knowledge. There are usually two solutions for this. First, extrapolate. It helps to be somewhat informed, so put on your imagery analyst's beanie and study comparable photos, then take a guess. Second, obfuscate. Remember that a lot of the details of your aircraft profile will be very small. If you can't read the pilot's name off the canopy rail in your reference photograph, maybe nobody will be able to read it in your drawing, either. Therefore, it may not matter whether you use the real pilot's name, your own name, or "Lieutenant Winnie the Pooh." (This is poor historical practice, but at the same time can be very amusing.) The other option (and a favorite of mine) is to hide your ignorance behind something opaque, like an external store (see previous discussion re Sidewinder missile-as-fig-leaf). Don't know what the wheel well looks like when closed? Doesn't matter if you stick a 300-gallon external fuel tank in front of it. As I have found in real life, hiding behind things obviously has some limitations (e.g., confirm that the airplane can actually carry a 300-gallon drop tank before painting one there) and sometimes can introduce new problems ("uh, does anyone know how to draw a 300-gallon drop tank?"), but under the right circumstances, it works fairly well. Step 2. Create a line drawing of your aircraft. I usually start with a canvas that measures about 2000 x 1600 pixels, which is large enough to capture most of the details of a tactical-sized aircraft without letting the file size get completely out of hand. There are several different ways to create your line drawing. One is to do it completely freehand. If you can do this, you shouldn't be reading this page since you obviously have plenty of artistic talent. I certainly can't do this. Instead, I usually take a reference photograph that is as close to the "perfect side view" as possible, stretch it out across the width of the canvas (rotating it if necessary), then roughly trace the overall shape of the airplane in a separate layer. Occasionally, if I can find a three-view drawing (often found in official technical publications like this Navy "standard aircraft characteristics" chart) I'll use that as a reference, but this almost never works because: (a) the three-view drawing is usually so small that blowing it up to 2000 pixels degrades all useful levels of fidelity; (b) the quality of publicly-available three-view drawings varies greatly -- many of them are small thumbnail sketches that do not faithfully replicate the nose shape at the required scale; and (c) publicly-available 3-view drawings of the aircraft types that I'm interested in are often hard to come by. I like photographs better because the original resolution is likely to be closer, and you'll have details that are sometimes missing from 3-view technical drawings. I avoid using other people's profile art as a reference, mostly because I think part of the fun is doing the profile interpretation yourself. Fig. 3. Ideally you will have been able to locate a number of photographs that will provide a good reference as to (a) the overall shape and proportions of the aircraft; and (b) the location of panel lines and other key aspects of the airframe. Most of the time the photos will only serve as a partial reference, as it's extremely rare to find the "perfect" photo to serve as your baseline. Study and extrapolate. At this point, you'll have the rough cookie-cutter outline of the aircraft, hopefully based on a photo taken from a relatively good angle. Now you'll have to fill in the outline. The reference photo itself may provide some useful cues for this (e.g., where the cockpit begins and ends, approximately where the engine nozzle is, where external antenna stubs are located), but my experience has generally been that I have to make a lot of adjusting corrections to offset the angle of the photograph. At some point, therefore, I wind up dropping the reference photo layer and filling in the outline freehand, based upon an examination of all of the photos that I've collected. Comparisons to 3-view drawings are useful for panel lines and the like, but always cross-check those lines against a photograph. My habit is to paint airplanes with the landing gear retracted, which usually also requires a fair amount of adjustment, as most of my useful photographs are of aircraft with the landing gear down. I often also have to draw a closed canopy, as many reference photos are taxi shots from airshows and show the canopy open. This is also the time to plan the other basic aspects of your drawing, including external stores (weapons and fuel tanks). Do this early. It is a colossal pain to have to go back to make major structural changes after you have painted and shadowed the airplane, so take care of this problem at the line drawing stage. Take your time on this step. It doesn't have to be perfect, but you should be comfortable that it portrays the airframe structure reasonably well. Remember that this is not a simple matter of tracing one photograph; you will be evaluating all sorts of different sources and then synthesizing your drawing based on all of it. It is tempting to move immediately to painting, but force yourself to slow down -- a weak foundation here is going to give you a headache later. Step 3. Lay down the base paint. Once you have your basic outline, it's time to paint the aircraft. Conveniently, U.S. aircraft are painted in colors that are defined according to Federal Standard 595B. For instance, "FS 36375", which is known as "light ghost gray," is a color with a red-green-blue value of 166-173-180. (You also can find all of the FS595B colors with equivalent RGB values here.) Corel allows you to create a custom palette of colors, which you can specify once you know the RGB value. I've created a custom palette consisting of the most common colors used on U.S. military aircraft, which saves some time. Characteristically, the military has official regulations that specify standard camouflage schemes for each aircraft type. These regulations (which are available online for the USAF, USN/USMC, and Army aviation) are a useful reference source, although specific aircraft (including the one you're painting) may vary. The nice thing about the regulations is that they specify the FS595B color for each component of the paint scheme. While all of this does not provide a perfect specification, it's a relevant baseline.
My general technique for painting is to take a large flat brush and paint over the entire outline (except for the canopy). I then drop this layer underneath the outline and mask and erase the excess paint falling outside the outline boundary. For two-tone camouflage schemes, I paint each tone in a separate layer to allow for easy adjustments. Once I'm satisfied, I combine the layers, apply a very light blend to smooth the boundary slightly, and then drop the layer beneath the outline for "trimming." Step 4. Paint the cockpit and canopy. The cockpit interior usually consists of the tops of the instrument panel, the HUD, and the tops of the crew ejection seats. I find this to be a hard thing to get right, partly because of the small scale and partly because photographs are often not very clear about what's there. The good news is that your work here is probably not going to be examined too closely, so get the shapes approximately right, cover it in a dark color, add some surface detail, and then trim it so it fits inside the aircraft. I typically don't add aircrew, because by and large, my renditions of human beings tend to frighten small children (see, e.g., self-portrait in Fig. 1).
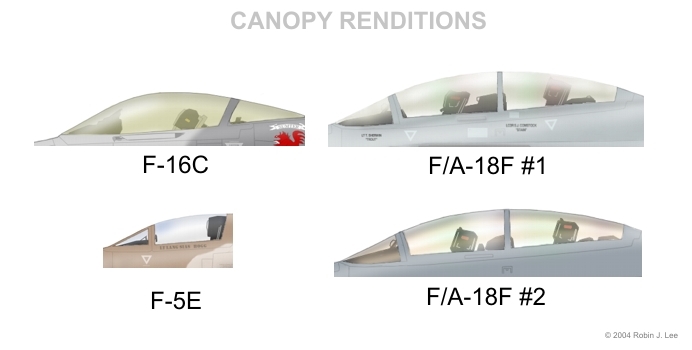
Fig. 5. Different approaches to canopies that I've tried. "F/A-18F #2" is what I'm currently experimenting with, which conveys a better sense of sunlight. Canopies are a lot of fun, and I'm constantly learning new techniques for how to render them. My basic approach is to blend several transparent lines of color, each of varying thickness, along the curvature of the canopy. Blend lighter colors to indicate "shine." Many modern tactical canopies seem to contain some kind of metallic compound that give the canopy glass a yellowish tint; under certain lighting conditions you get other sorts of colors. Experiment and blend to your satisfaction, then drop it under the basic outline and trim to fit. Remember, the canopy layer should be on top of the cockpit interior layer, which will tint your ejection seats. My general conclusion is that less is more in this area -- overblending too many layers leads to watery results. Step 5. Add light and shadow. At this point your airplane looks pretty flat. To add depth, you need to paint in lighting effects on your airframe. Fortunately, the software allows you to experiment with different lighting effects with relative ease. Be prepared: it's likely to take some trial-and-error to get it right. This is a good time to advance to a new save file. After a fair amount of trial-and-error, I generally like to assume a diffuse light source shining down at an angle (i.e., not from directly above the airplane). This means that underwing shadows are relatively short and light, and should be rendered with aggressive blending and a high degree of transparency. For highlighted areas (such as the shine along the upper surface of the nose), I use white with a less-aggressive blend and transparency setting, as light areas are usually more subtle than dark areas. In all cases, light and shadow layers should go on top of everything else.
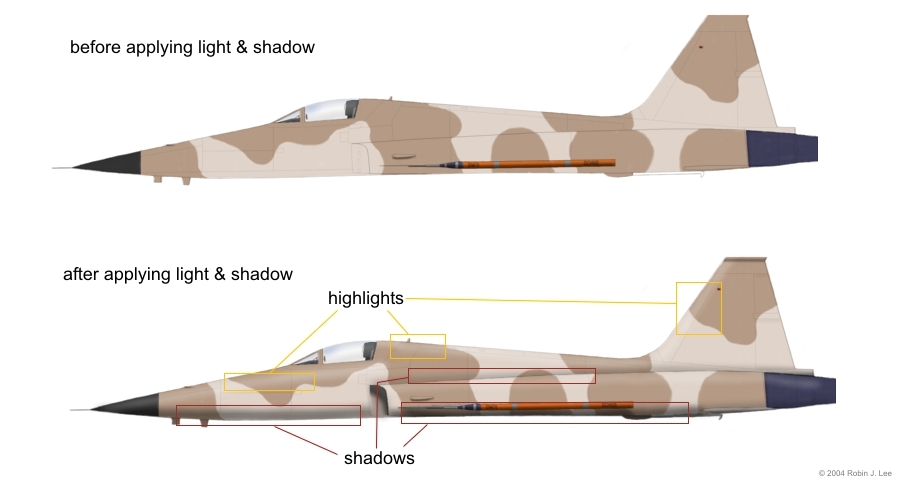
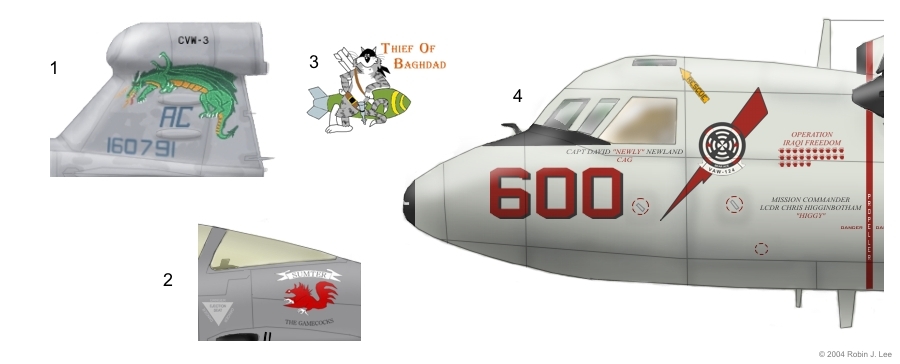
Fig. 6. Prior to applying light and shadow, the aircraft looks flat. Pay attention to the curves of the airframe, as well as to any potential skin texturing. As you can see, a properly done set of light and shadow layers can make all of the difference. I am still very much climbing the learning curve when it comes to this, and I usually take some time for free-form experimentation. Sometimes this gets a little bit tricky, as you're dealing with a lot of overlapping, highly transparent layers, and occasionally you'll need to backtrack to keep things under control. Study your reference photos. The key here is to understand the surfaces of your airplane. As a general rule, the lumpier the airplane, the more complicated this gets. (Ask me why I haven't done a helicopter yet.) Step 6. Paint aircraft markings. You now have a painted aircraft with no unit markings, with all shadows and lighting properly applied. You essentially have a blank, which you can now paint. Save into a separate file now, as you'll later want to use this model as a base if you paint other variants of this same aircraft. I like to think of painting aircraft markings as "applying decals" to a plastic model. Here's where all of that research in Step 1 pays off. I have a lot of fun with this stage, as this is usually where the airplane starts assuming some individual character. For certain standardized types of markings (like the "star-and-bar" insignia and certain common warning labels), considering maintaining a library of pre-built objects that you can reuse in future projects. This saves the time of having to recreate elements that are common to all U.S. military aircraft. Recently, I built a large "star-and-bar" national insignia using the official military graphic specification (including proper FS595B colors), and expect to be reusing it in future projects.
The main rule of thumb is to draw big, then shrink down. Your grinning skull, rooster, tomcat, or whatever else is not likely to look like much if you try to draw it in its tiny actual size. However, if you carefully paint it in a separate document at a huge resolution of 800x600, you're likely to get a much better result that can then be scaled to fit. A word on aircraft lettering: the fonts that the modern USAF and USN/USMC usually use are somewhat unique (called "Amarillo" and "Long Beach", respectively). You can draw the lettering by hand, but some time can be saved if you have the base font to work from. Recently I discovered a commercial font package that includes both fonts, and I've been pleased with the results. There may be freeware renditions floating around the web as well; check the scale modeler's sites. Remember that sequence is important here. Generally, I put all of the layers containing markers beneath the light and shadow layers, above the basepaint layer, and usually (but not always) below the line drawing layer. (See the large "600" modex number on the E-2C pictured above for why this is the case.) You may need to experiment with transparency to ensure that panel lines intersect the markings where appropriate. Step 7. Perform final touch-up. At this point you have a painted, lit, marked airplane that looks like it just emerged from the production line. If your airplane is supposed to be wearing a brand-new coat of paint, then you may be done. However, most military aircraft lead fairly rugged lives, and after a few hundred hours of operation they start to show some external signs of wear-and-tear. This is particularly true for carrier aircraft, as routine corrosion control procedures start to give even brand-new airplanes a splotchy appearance after a few months. A semi-transparent layer of light and dark blended traces along key panel lines will help to convey this appearance.
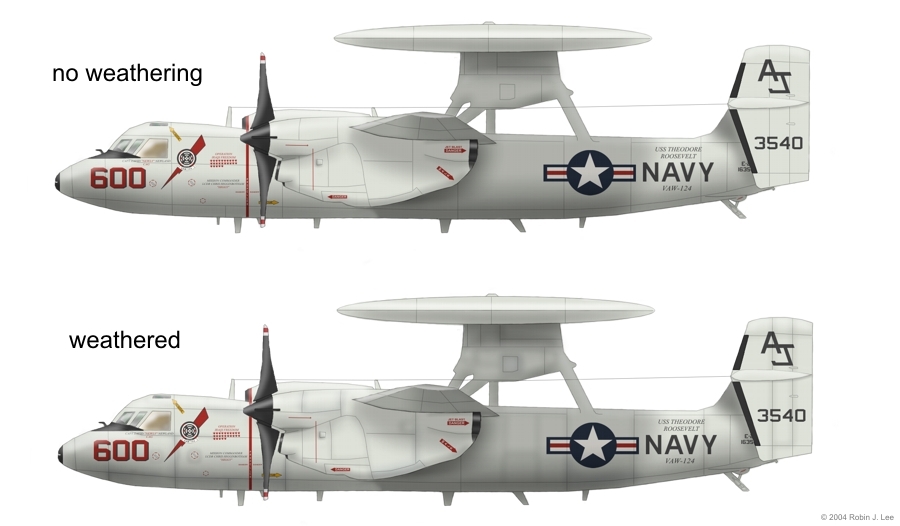
Fig. 8. Compare the two renditions of this E-2C Hawkeye. The example on the top is painted, lit, and shadowed, but it has the complexion of a newborn. This particular aircraft was at the end of a strenuous deployment (carrying mission tallies indicating 25 combat missions), and should be a little more worn. The bottom example shows the results of adding a transparent top layer containing assorted smudges, paint patches, and so on. This is also a good time to look for minor shadows and fine details that were missed before. I usually like to do the final touch-up in a separate session, because at that time my eyes are fresh and I'm more likely to notice the little things. This phase is really about polish, and can go on indefinitely. I'm still improving images that I "finished" months and months ago, as I look to retrofit my old creations with new techniques that I've picked up. This is a good reason why you should save your source files in multiple versions at major steps in the process -- it's easy to go back to try something different. Final Notes Hopefully this guide will offer some useful hints to people starting out in the same way that I did -- who have a love of airplanes and an appreciation for aircraft art, but lack art training and may in fact have no particular aptitude for conventional drawing or painting. For me, software really does make it easier, chiefly because it (a) translates some tricky real-world mechanical techniques into a familiar computer interface; and (b) facilitates easy, mess-free, experimentation. Virtually everything that I've learned so far, including most of the "techniques" described on this page, has been the result of vigorous trial-and-error and the liberal use of the "undo" function. I'm still closer to the bottom of the learning curve than the top, but as I experiment with each creation I learn a little bit more and get a little bit better. I originally did my first aircraft profile as a fun way to satisfy a random creative impulse. These days, I use it as a means of unwinding after work, when my left brain is about to collapse but my right brain still insists on being entertained. It is a tidy, portable recreational activity with almost no setup or cleanup requirements, and it can be stopped and started in bite-sized segments of free time -- perfect for squeezing into an otherwise demanding schedule. And besides, since I was a child, I have always found something strangely therapeutic about spending an hour or two coloring airplanes. -RJL. Coming soon: A Novice's Gallery of Digital Aviation Profile Art |
| February 29, 2004 || Return to Vulture's Row || Return to Home Page || E-mail |
| Copyright © 2004 Robin J. Lee <robin.lee@aya.yale.edu>. All rights reserved. |